Introduction:
Running effective online advertising campaigns involves more than just creating ads and setting budgets. It’s crucial to measure the success of your campaigns by tracking conversions, which are the actions you want your website visitors to take after interacting with your ads. One common conversion is when a user completes a purchase or fills out a contact form, leading them to a thank-you page. In this article, we’ll guide you through the process of creating a Google Ads conversion for a thank-you page using Google Tag Manager (GTM).
Before you begin, ensure that you have the following set up:
Google Ads Account: You should have an active Google Ads account with the relevant campaigns and ads.
Google Tag Manager Account: Create a Google Tag Manager account and set up a container for your website. (If you already have Google Tag Manager account then skip this step)
Thank-You Page: Have a thank-you page on your website that visitors are directed to after completing a desired action (User filled a Form etc)
Step-by-Step Guide
Follow these steps to set up a Google Ads conversion tracking using Google Tag Manager for your thank-you page:
Step A : Create a New Conversion Action in Google Ads
- Log in to your Google Ads account.
- Click on “Tools & Settings” and then select “Conversions” from the Measurement section.
- Click on the “+ Conversion” blue button to create a new conversion action.

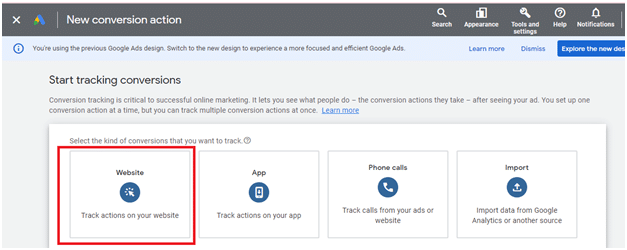
- Select the website option and provide the domain name of your website.

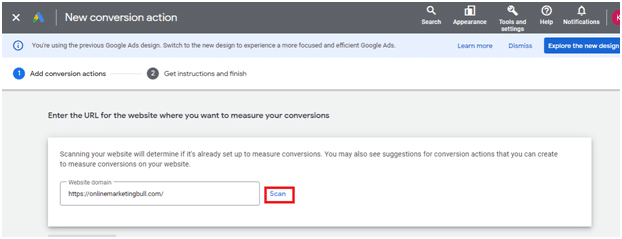
- Enter the URL for the website where you want to measure your conversions and click “Scan”

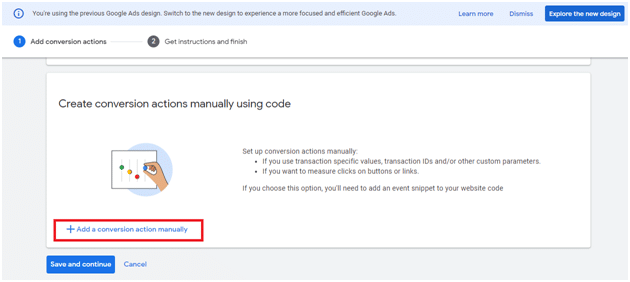
- Scroll down, add the conversion manually and give it a relevant name.

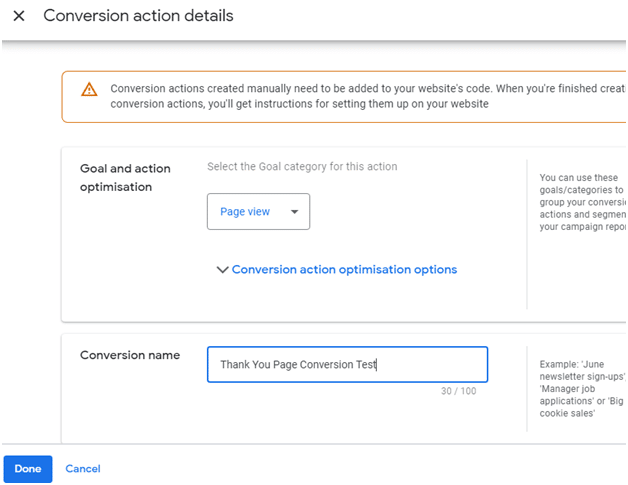
- Provide Conversion Action Details such as the conversion name , value, count, and goal category, Attribution (Data Driven) and click on “Done” button and Click “Save and Continue.”

Step B : Set Up the Conversion Tag in Google Tag ManagerNow, let’s move on to Google Tag Manager.
1) Log in to your Google Tag Manager account
2) Go to your container and click on “Tags.”
3) Click on the “+ New” button to create a new tag.
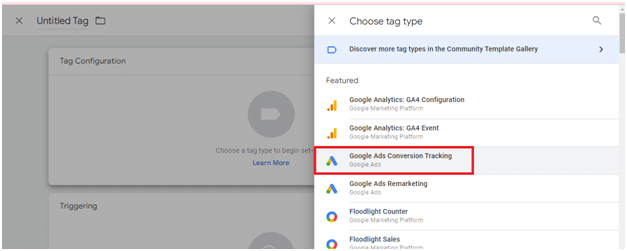
4) Choose the “Google Ads Conversion Tracking” option and create a new tag.
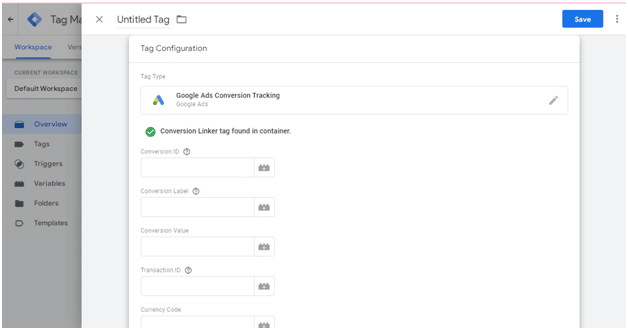
5) You will see empty “Conversion ID” and “Conversion Label”, you need to fill “Conversion ID” and “Conversion Label” in next step.
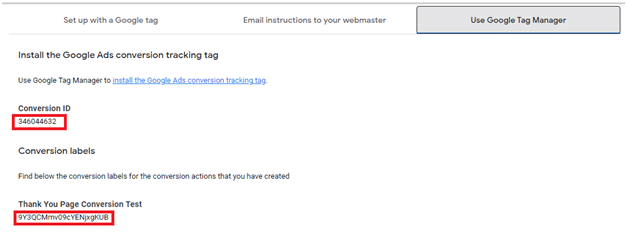
6) Copy the Conversion ID and Conversion label from from Google Ads Conversion you had created earlier in Google Ads.


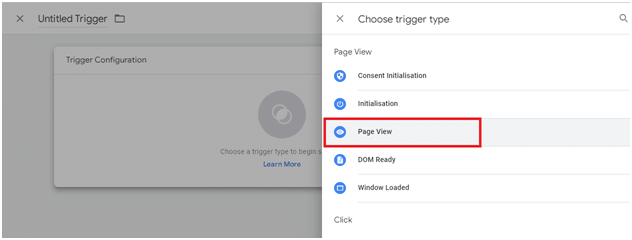
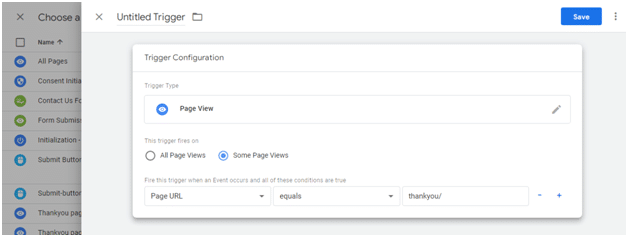
Chose “Some Page View” and Copy the URL of the Thank You Page from your website and paste it into the relevant field. Next, give relevant name to your trigger and click “Save” button.
6) Give your tag a relevant name to help you identify it easily. Once you’ve completed the necessary configurations, click “Done.”
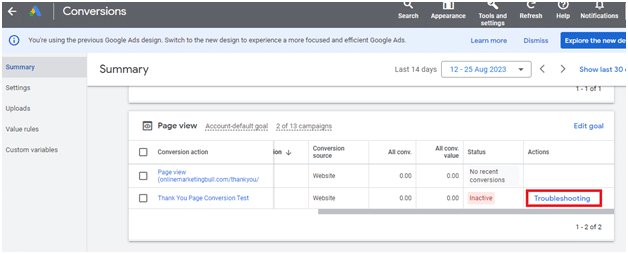
7) Test Your Thank You Page Conversion >> At this point, it’s essential to test your thank you page conversion to ensure that everything is set up correctly. This step is crucial to verify that the conversion tracking is functioning accurately. For testing your thank you page conversion go back to Google Ads and click “Troubleshooting” and follow the steps. (fill the contact form on your website, you reach to Thankyou page after fill the form)

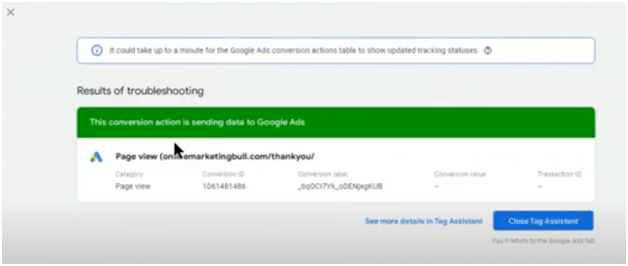
If you see screen-shot below it means conversion action is sending data to Google Ads and you have setup Thank you page conversion successfully

- After verifying the tracking, wait for a few conversions to occur naturally or simulate them for testing purposes.
- In your Google Ads account, navigate to the “Conversions” section and check if the conversions are being recorded. Monitor the conversion data to assess the performance of your campaigns and optimize accordingly.
In conclusion
Implementing Google Ads conversions for your thank you page using Google Tag Manager offers several advantages. Firstly, it simplifies the process of tracking conversions, eliminating the need for manual coding.Secondly, it provides a centralized platform for managing your tags, making it easier to make changes or updates in the future. Lastly, Google Tag Manager allows you to test and verify your conversions, ensuring accurate tracking and reliable data for analyzing campaign performance.Google Ads conversions are vital for measuring the success of your advertising campaigns.By utilizing Google Tag Manager, you can streamline the process of implementing conversion tracking codes on your website’s thank you page. This powerful tool simplifies the setup, management, and testing of conversions, providing you with accurate data for optimizing your advertising efforts. Start harnessing the power of Google Ads conversions today and unlock the true potential of your online advertising campaigns.
FAQ (Frequently Asked Questions)
Google Ads conversion tracking is the process of measuring the success of online advertising campaigns by tracking specific actions that users take after interacting with ads, such as completing a purchase or filling out a contact form.”
Tracking conversions helps advertisers understand the effectiveness of their campaigns and the return on investment (ROI). It provides insights into which ads and strategies are driving desired actions on their websites.”
To set up Google Ads conversion tracking using Google Tag Manager, follow the step-by-step guide in the article. It involves creating a new conversion action in Google Ads, setting up the conversion tag in Google Tag Manager, and testing the tracking to ensure accuracy
Using Google Tag Manager simplifies the process of tracking conversions by eliminating the need for manual coding. It provides a centralized platform for managing tags and offers testing and verification capabilities for accurate tracking and reliable data.
Google Ads conversions allow advertisers to measure the success of their advertising campaigns and understand which strategies are driving desired user actions. This data is crucial for optimizing campaigns and improving ROI.”

